

Run a 2 to 3 minute pre-start safety check every time you climb into the cab, and complete a full 10 to 15 minute daily walkaround before the first shift starts. Any damaged ROPS or FOPS frame, a failed operator-presence interlock, or an active hydraulic leak means the machine gets tagged out of service, not operated around. Keep written records of every check. OSHA expects frequent equipment inspections, and a paper trail is what protects you when an inspector or an insurance adjuster asks what you knew and when you knew it.
TL;DR:
- Ensuring interlocks, hydraulic hoses, and quick-attach pins are fully engaged and secure prevents immediate safety hazards during daily inspections.
- Maintenance should be tracked by engine hours, with specific service intervals at 50, 250, 500, 1,000, and 2,000 hours to catch wear early.
- A documented inspection history, including service records, is critical when purchasing used skid steers, as it reveals hidden wear and potential issues.
- Visual checks alone are insufficient; pressure-bleed, look for signs of fluid seepage, abrasion, or soft spots, and confirm repairs before returning the machine to work.
- Precise recordkeeping and tagging out machines with identified issues are essential to meet OSHA requirements and prevent serious safety violations.
Table of Contents
- Skid Steer Inspection: The 2 to 3 Minute Pre-Start Check
- The Daily Pre-Shift Walkaround, Step by Step
- How Do You Safely Inspect Hydraulics and Attachments?
- Fluids, Filters, and Battery: The Checks Operators Skip
- Tires, Tracks, and Undercarriage: What Affects Stability
- Engine-On Function Tests That Catch Hidden Problems
- Recordkeeping, Tagging Out, and What OSHA Expects
- Skid Steer Maintenance Intervals by Engine Hour
- What Buyers and Fleet Managers Should Take From This
- What the Checklist Gets Right, and Where Operators Cut Corners
- Find Skid Steers With Verified Inspection History
- Sources
- FAQ
Skid Steer Inspection: The 2 to 3 Minute Pre-Start Check
This is the check you run every single time you get into the cab, even if you were operating the same machine an hour ago. It is not a substitute for the daily walkaround. It is a fast gate that catches the failures most likely to hurt you the moment the machine moves.
- Buckle the seatbelt and lower the restraint bar; confirm the seat bar interlock cuts hydraulic function when raised.
- Center the joysticks and pedals and verify they return to neutral on their own.
- Test the horn, backup alarm, and all working lights.
- Check that quick-attach pins are fully engaged and auxiliary hydraulic couplers are seated tight.
- Scan the cab for loose tools or debris, and check mirrors and glass for a clear line of sight.
If any interlock fails to cut power, or a pin looks partially engaged, do not operate the machine. Shut it down and flag it before you touch another control.
The Daily Pre-Shift Walkaround, Step by Step
The daily walkaround happens with the engine off, attachments lowered flat to the ground, and the parking brake set. Give the hydraulic system a minute to bleed down before you get close to any line or cylinder. This single habit prevents most of the puncture wounds tied to high-pressure fluid injection.
Work the perimeter in a consistent order so nothing gets skipped:
- Check engine oil, hydraulic oil, coolant, DEF, and fuel levels, and look closely for milky or discolored oil that signals water intrusion.
- Inspect every visible hose and fitting for seepage, abrasion, or a bulge in the hose wall.
- Grease pivot pins and fittings per the OEM service schedule.
- Examine the ROPS/FOPS frame and side screens for cracks, dents, or missing bolts.
- Pull on the seatbelt webbing to check for fraying, and confirm the quick-attach plate locks solidly.
This full walkaround, layered on top of the quick pre-start check, is the two-tier structure that compact equipment safety guidance recommends, and it is the single habit most likely to catch a problem before it becomes an incident.
How Do You Safely Inspect Hydraulics and Attachments?
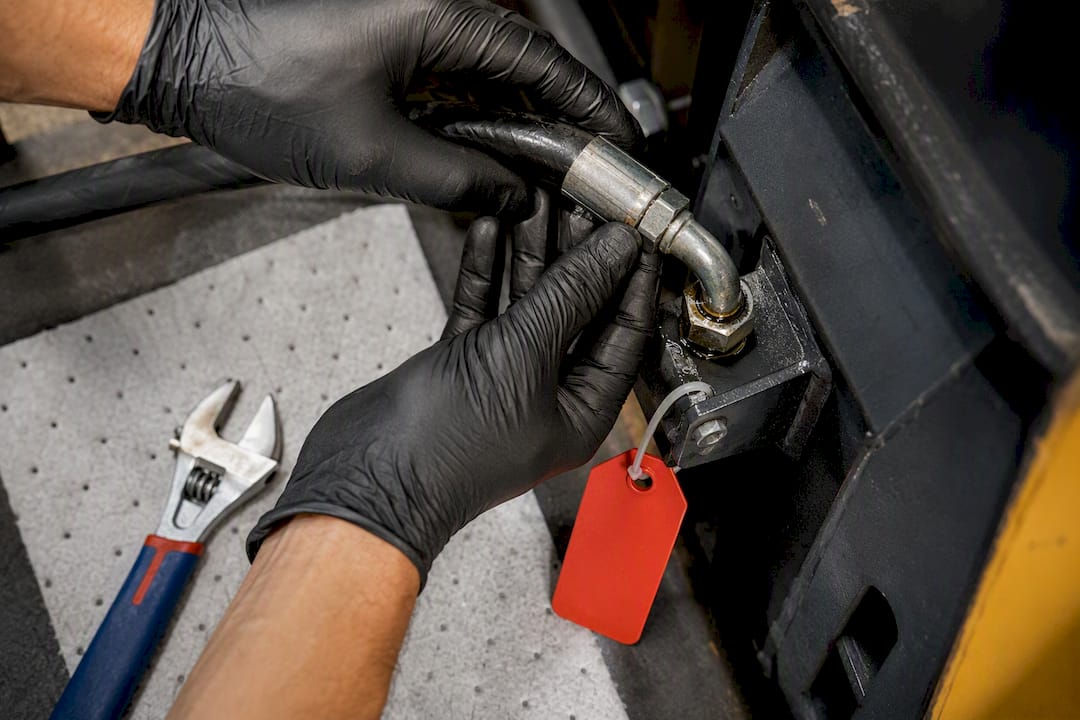
Inspect hydraulic lines cold, after pressure has had time to bleed off. Never run a bare hand along a pressurized hose looking for a leak. A pinhole leak under system pressure can inject fluid through skin before you feel anything.
Look for wet fittings, bubbling residue, abrasion where a hose rubs against the frame, or a soft spot in the hose wall. Seepage around a cylinder base usually points to a failing rod seal, not a loose fitting. On the attachment side, give the quick-attach lever a manual tug to confirm the locking pins are fully seated, wipe down the mating surfaces so debris doesn't compromise the fit, and check that the auxiliary hydraulic hose is secured, not dangling near a moving pivot point.
- Cold inspection only. Bleed pressure before touching a line.
- Wet, bubbled, or abraded hose surfaces mean replacement, not a wipe down.
- A cylinder that seeps at the base needs a seal repair before the machine goes back to work.
Pro Tip: Hold a piece of cardboard near a suspected leak instead of your hand. If fluid injects into the cardboard, it would have gone into your skin, and that's a trip to the emergency room, not a shop repair.
Any pressurized leak or damaged hose found during this check is an automatic tag out. Repair before the machine returns to a jobsite.
Fluids, Filters, and Battery: The Checks Operators Skip
Level checks alone miss half the problem. Oil that reads full but looks milky or gritty is already telling you something failed upstream, and a battery that shows charge but has corroded terminals will strand you at the worst possible moment.
- Check engine oil level and color; contamination shows up as a milky tint or metal flecking.
- Confirm coolant level and look for oil sheen in the reservoir, which points to a head gasket problem.
- Watch hydraulic oil for sudden level drops between checks, a sign of an undetected leak.
- Inspect the air filter for dust loading and drain the fuel water separator.
- Check battery terminals for corrosion and confirm the battery is mounted securely, not rattling loose.
- Top off DEF. Modern Tier 4 diesel engines will derate power output if the DEF tank runs dry, cutting your machine's usable power mid shift.
Tires, Tracks, and Undercarriage: What Affects Stability
A skid steer's stability depends almost entirely on what's touching the ground. A soft tire or an over-tensioned track changes how the machine handles a load long before it becomes an obvious problem.
- On wheeled machines, check tire inflation, look for sidewall cuts, and torque-check lug nuts.
- On tracked machines, inspect pad wear and verify tension. Both over-tight and over-loose tracks accelerate wear and increase derailment risk.
- Clear packed debris from sprockets and rollers before it works its way into the drive components.
- Look underneath for fluid drips or loose hardware. Either one usually points to a bigger failure developing in the undercarriage.
Engine-On Function Tests That Catch Hidden Problems
Once the walkaround is clean, start the engine and run through function tests before you put the machine to work. This step catches the internal wear that a visual check can't see.
- Run the dash self-test, watch the gauges settle, and listen for knocking or grinding at idle.
- Cycle every control through its full range of motion; watch for jerky movement, delayed response, or drift while holding a position.
- Raise the lift arm, hold it, and watch for slow drift downward, which signals an internal cylinder leak past the piston seal.
- Test the parking brake hold and confirm the travel response matches joystick input without lag.
Delayed response usually means air in the hydraulic lines or a low fluid level. Drift under a held position almost always means a seal is failing internally, even when the outside of the cylinder looks dry.
Recordkeeping, Tagging Out, and What OSHA Expects
A usable inspection record needs the date, the operator's name, the machine's ID number, what was checked, what failed, and what corrective action was taken. Skip any of those fields and the record is nearly useless if a safety question comes up later.
- Record every checkpoint result, not just the failures, so a pattern of wear shows up over time.
- Tag a failed machine clearly with a do-not-operate marker and route it to maintenance immediately.
- Document when the repair is completed and who verified it before the tag comes off.
- OSHA requires frequent equipment inspections, and under the 2026 adjustment, a single serious violation can carry a civil penalty up to $16,550, with willful or repeated violations reaching up to $165,514.
Skid Steer Maintenance Intervals by Engine Hour
Calendar-based maintenance misses the point. A machine that sits idle for three weeks and then runs 60 hours in one week needs service tracked by hours, not by date on a wall calendar.
- Pre-start: every time, before the operator moves the machine.
- Daily: full walkaround before the first shift, every working day.
- 50-hour / weekly: grease points, belt tension, and a fluid recheck.
- 250-hour: engine oil and filter change, complete grease of all fittings.
- 500-hour: fuel filter and air filter service.
- 1,000-hour: hydraulic fluid and filter service.
- 2,000-hour: powertrain inspection, including drive motors and final drives.
Fleets that track service against engine hours instead of the calendar see fewer premature component failures, and telematics systems that auto-flag milestone hours make it far easier to stay on schedule than a paper log tucked in a glove box.
What Buyers and Fleet Managers Should Take From This
A checklist and inspection guidance are important because the gap between "looks fine" and "is fine" on a used machine usually costs someone real money. If you're evaluating a skid steer for purchase, run the same pre-start and daily walkaround steps above on the machine before you agree to a price, not after you own it.
Ask the seller for maintenance logs and any documented inspection history alongside the physical check. A machine with 1,800 hours and no service records tells a different story than one with 1,800 hours and a full paper trail behind it.
What the Checklist Gets Right, and Where Operators Cut Corners
The industry treats inspection as a single event, and that's the mistake. A 2 to 3 minute pre-start check and a 10 to 15 minute daily walkaround serve different purposes, and collapsing them into one habit is how interlock failures and hydraulic leaks slip through. The pre-start exists because interlocks fail silently, a critical concern when preparing a site, as explained in our lot clearing for construction guide. Nobody notices a seat bar sensor has stopped cutting power until the day it matters.
Where conventional advice falls short is treating the checklist as a compliance exercise instead of an early-warning system. A checklist that gets rubber-stamped without actually testing the restraint bar interlock or watching for cylinder drift is worse than no checklist, because it creates a false paper trail of safety. OSHA's penalty structure exists precisely because too many fleets treated "we have a form" as equivalent to "we checked the machine."
If you take one thing from this: prioritize the interlocks and the hydraulic system over everything else. A worn tire tread is a scheduled repair. A seat bar that doesn't cut hydraulics, or a hose that's about to fail under pressure, is the difference between a normal shift and an emergency room visit. Buyers evaluating a used machine should weigh a documented PM history from an owner who tracked engine hours far more heavily than a clean paint job.
— Dave
Find Skid Steers With Verified Inspection History
Some marketplaces give you a faster path to a trustworthy used skid steer than cold-calling dealers and hoping their paperwork is in order. Listings on some marketplaces can include photos, service records, and seller contact details in one place, so you can cross-reference a machine's condition against everything covered in this checklist before you ever see it in person.
Before you commit to a purchase, ask the seller directly for inspection forms and maintenance logs, the same fields covered in the recordkeeping section above. A seller who can't produce them is telling you something. Buyers evaluating ownership paperwork on a larger machine can also review this equipment ownership transfer checklist for what documents should change hands at sale. When you're ready, browse current construction equipment listings on Sostruckforsale, filter by category and location, and reach out to a seller directly through the platform to request records before you make an offer.
Sources
Download the OSHA penalty adjustment memo, Bobcat's machine inspection guide, and the UF extension pre-op checklist for printable reference.
- 2026 Annual Adjustments to OSHA Civil Penalties
- Skid Steer Pre-Start Inspection Checklist for Compact Equipment Safety
FAQ
What Is the 70/30 Rule for Skid Steers?
It's a rule of thumb operators use to avoid tipping forward when carrying a bucket at height, not a formal engineering standard.
What Are the Maintenance Requirements for Skid Steers?
Maintenance follows an hour-indexed schedule: daily fluid and visual checks, then service milestones at 50, 250, 500, 1,000, and 2,000 engine hours covering oil, filters, hydraulic fluid, and powertrain components. Tracking by engine hours rather than the calendar catches wear before it causes a breakdown.
What Is a Good Hourly Rate for Skid Steer Work?
Rates vary widely by region, attachment type, and whether an operator is included, and no single national figure applies to every job. Check regional equipment rental listings and operator rate sheets in your area for a current, location-specific number rather than relying on a flat industry average.
What Is a 7 Point Inspection?
An inspection typically groups skid steer checks into core categories such as fluids, tires or tracks, hydraulics, safety systems (ROPS/FOPS, seatbelt, interlocks), controls and functions, structural components, and visual/cosmetic damage. It's a simplified way to organize the same pre-start and daily walkaround steps covered above into memorable groups rather than a separate regulatory standard.
How Often Should I Inspect My Skid Steer?
Run the 2 to 3 minute pre-start check every time you enter the cab, and complete the full 10 to 15 minute walkaround before each shift. Add hour-indexed PM service on top of both, since daily checks catch immediate hazards while scheduled service catches wear that builds up over time.